Monday, January 2, 2012

ACDSee: Accessing frequently used folders using the Favorites Panel


ACDSee: Accessing frequently used folders using the Favorites Panel

Don’t you love it when you find a trick that makes using your favorite software even better? If so then here’s a great tip for quickly accessing your frequently used folders in ACDSee. If you find yourself frequently using the same folders then make those folders a Favorite and use the Favorites panel to quickly access those files. Here’s how…
To make a Favorite Folder:
You can create shortcuts to folders and files, and even run executable files, from inside the Favorites pane. Favorite shortcuts can be copied, renamed, moved, or deleted just like a folder. You can even use an executable shortcut to start another application from inside ACDSee Pro. You can also create a shortcut by dragging a file, folder, or executable file directly from the File List pane to the Favorites pane.

For any folder you visit often, right click on the folder and choose Add to Favorites.

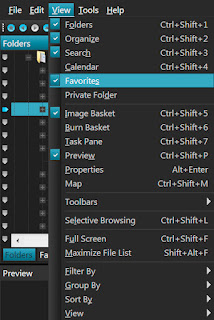
To use Favorites: Just click on the Favorites tab next to the Folder tab. Then click on a  folder within the Favorites panel to select that folder. You can also use View> Favorites to access the Favorites Folders.

  
Suggested Favorites Folders:
·         Unzipped Folder
·         Download Folder
·         Fonts Folder
·         My Layouts

Saturday, December 3, 2011

ACDSee from DigiScrapInfo Update

Heidi Vanyo's DigiScrapInfo site is now closed. I'd planned to save some of the information here but as I looked through the articles I realized they were very dated and it probably would not be very useful. All of the articles relate to versions that are at least 2 versions behind the current ACDSee versions and therefore have limited usefulness.

Look for some new post relating to digital scrpabooking and ACDSee beginning in January 2012. 

Thanks! 

Marcie

Sunday, November 27, 2011

ACDSee: Using Favorites for frequently accessed folders


Using Favorites for frequently accessed folders

Ever wonder what you were thinking when you miss the obvious? Do you have folders that you frequently browse inside ACDSee Photo Manager? Why not just make that a favorite folder and use the Favorites pane?
First, let me mention that you can easily setup the default path of where ACDSee’s folder pane opens to.
Setting up Default Start Folder:
  1. Go to Tools | Options
  2. Click on Browser
  3. Select Specific Folder
  4. Click on browse to the right of the box and choose the default path that you want ACDSee to start in.
  5. Click OK
I don’t usually have this option set because my digital images are not on my laptop. I store everything on a EHD. When I set this option to my EHD, it does work while my EHD is connected. If my EHD is not connected, when I start ACDSee Photo Manager it changes the default back to My Pictures. So I rarely go back and switch it back.
So another option is to use Favorites. And this can be in addition to changing the default start folder.
To make a Favorite Folder:
For any folder you visit often, right click on the folder and choose Add to Favorites.
To use Favorites:
  • To view the Favorites pane, go to View | Favorites and it will show up where your Folders pane usually is.
  • Just click on a folder in your Favorites pane and you will go to that folder.
  • There are tabs at the bottom of that pane to switch between Favorites/Folders which I use frequently.
Some Ideas:
I have created Favorite Folders for:
  • my Fonts folder (in C:\WINDOWS\Fonts)
  • my main digital scrapbooking folder
  • my layouts
  • Originally posted October 15th, 2007 by Heidi Vanyo at DigiScrapInfo.com

Thursday, November 24, 2011

ACDSee: Assigning Kit Name and Designer


How to assign the Kit Name & Designer

Written by Heidi Vanyo

  • Adding the kit name or designer name can be done at anytime. Before you assign categories to images in your kit or after.
  • Once you follow the instructions in this tutorial, every element/image in the kit will contain the designer's name and kit name.
  • Select a digital kit you want to work with. In my example I am using Toni Berman's, Crushed Banana kit.
  • The process to select all images in the digital kit can be done in several ways. I provide 2 options below on how to do this quickly and efficiently.
    1. Option 1 using Search Feature
      • Right click on the folder of the digital kit and choose Search.rokbox
      • Accept the default options that come up and click Start.
    2. Option 2 using the folders pane will be covered in a future blog post. 
      1. Now all elements in this kit and its subfolders come up. Edit | Select all or Ctrl-A to select all the images. Verify that all your thumbnails are highlighted.
      2. Bring up your View | Properties window by View | Properties, make sure you click in the database tab
      3. Type in author and kit name. If it says Multiple Values, just erase over it and type in author & kit name
        .

      How to Search using Designer Name

      1. To search for a particular designer, bring up the organize pane View | Organize
      2. In the Organize pane, find the Auto Categories section,
        1. click on Photo Properties to expand,
      3. click on Author to expand
      4. Select desired designer
       

      How to Search using Designer Name & Category

      1. To search for a particular designer, bring up the organize pane View | Organize
      2. In the Organize pane, find the Auto Categories section,
        1. click on Photo Properties to expand,
      3. click on Author to expand
      4. select desired designer
      5. select the desired category. For example, I have a category called paper. So in this example, it will bring back all my Toni Berman Paper
      . 


      How to Search using Kit Name

      In this example, I will search for my kit "Crushed Banana"
      1. Open your search pane View | Search
      2. Click on Add... in the Properties section.
      3. Expand ACD Database and Select Caption
      4. Now click in the , type in the name of your kit. In my example, I type "Crushed Banana".
      5. Now click Start at the bottom and it will show you your kit.
      Note: The obvious drawback is you need to remember the name of the kit and spell it exactly right. It is useful if you remember the kit name and don't know where you saved it
      .


      How to customize your thumbnails to show designer and kit name:

      1. Go under Tools | Options,
      2. expand File List,
      3. click Thumbnail Info,
      4. click Choose Thumbnail Info.
      5. In this first example I have added Author. Click on ACDDatabase on the left to expand it out, click in theAuthor box, and click Add.
      6. Click OK, and OK again. And this is what you see:
         
      If you want to see Kit Name & Author and no filename.
      First I removed the file name. (Not sure if you will like this. I use my images by dragging and dropping into my editor so I rarely refer to filename.)
      1. Go to Tools | Options,
      2. expand File List,
      3. Click Thumbnail Info.
      4. Uncheck the box that says File name.
      5. Last, repeat the steps from customizing your thumbnail and add Caption in addition to Author. 
      6. You will get this:
         
      Now that you know how to customize your thumbnails, you can make them how you want to!
      If you are wondering about what Choose Tiles Info, its the same thing except its for the Tile view. To switch to the tile view, choose View & select Tiles (right above your thumbnails and images) I don't like this view as much but maybe you will.